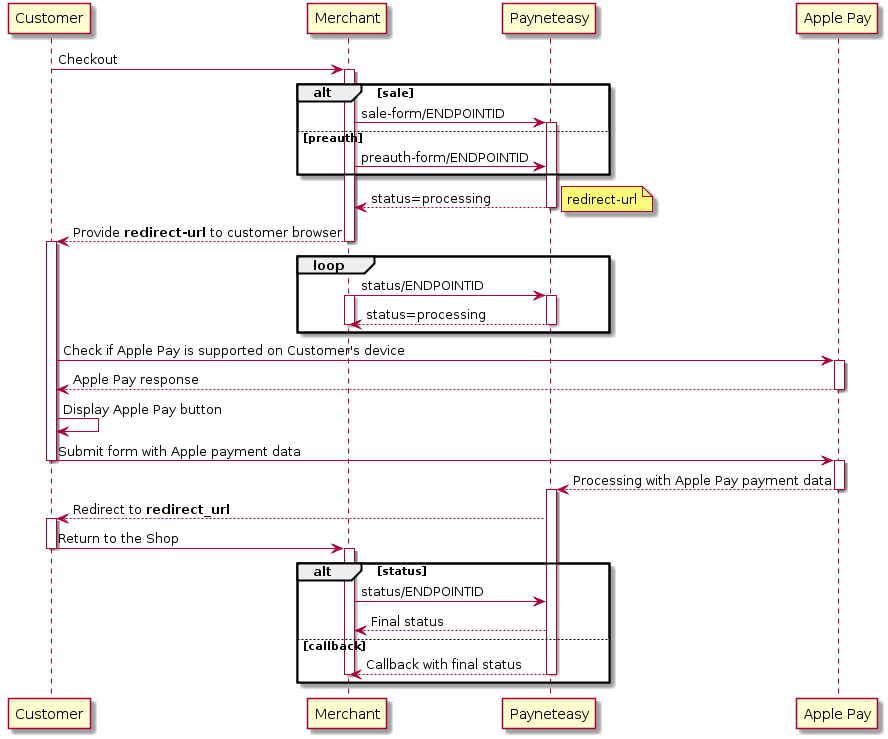
2.7. Apple Pay Account Setup
2.7.1. Payment Processing Certificate
- Merchant ID.
- The private key of the Payment Processing Certificate.
- Private key password.
Step 1. Register Merchant ID
- Open developer account. Go to Certificate, Identifiers & Profiles.
- Go to Identifiers.
- Click on “+”.
- Select Merchant IDs.
- Specify the description and the Merchant ID. It is recommended to use the website domain in reverse order with the merchant prefix. Example: merchant.com.Payneteasy.applepay.test.
- Click Register.
Merchant ID is now registered.
Step 2. Create Certificate Signing Request
- Open Keychain Access on Mac.
- Certification assistant -> Request a certificate from a Certificate Authority.
- Specify the email, to which the developer’s account was registered, the name (also key name). Select Saved to disk and Specify information about a pair of keys manually.
- Select the key size 256 bits and the ECC Algorithm. Click Continue button. Save the .certSigningRequest file.
Step 3. Issue Payment Processing Certificate
- Return to the developer’s office. Go to Certificates, Identifiers & Profiles / Identifiers. Select needed Merchant ID.
- Click Create Certificate in Apple Pay Payment Processing Certificate section.
- Select “No” and click Continue.
- Choose .certSigningRequest file from step 2 and click Continue.
- Download Payment Processing Certificate.
Step 4. Get the certificate private key and private key password
- Double click Payment Processing Certificate on Mac to install.
- Open Keychain Access and go to Certificates section.
- Find the certificate. Select the created key by clicking on the arrow next to it.
- Select Export with the right mouse button.
- Select the folder to save the key file in .p12 format, click Save.
- Create password and click OK. Private key <name>.p12 and private key password are ready to work.
Reissue of Payment Processing Certificate
- Create a new Certificate Signing Request, as described in step 2.
- Issue a new Payment Processing Certificate as in step 3. After creating a new certificate for the current Merchant ID, there will be two certificates: old (active) and new (requiring activation). At this step there is no need to activate the new certificate.
- Get the certificate private key, private key password and send them to Payneteasy support service as in step 4.
- Activate a new certificate only in consultation with Payneteasy support service. After activation, only the new certificate will be used, the old one will become inactive.
2.7.2. Merchant Identity Certificate
- Merchant ID.
- The private key of the Merchant Identity Certificate.
- Private key password.
Domain registration and verification
Warning
Please note that before receiving the Merchant Identity Certificate, it is compulsory to create and validate domains where Apple Pay will be used.
- Go to the developer’s office and go to Certificates, Identifiers & Profiles. Create a Merchant ID before domain registration.
- Go to Identifiers.
- App IDs -> Merchant IDs.
- Select the needed Merchant ID.
- Click Add Domain in Merchant Domains.
- Specify the domain where Apple Pay will be used and click Save.
- To confirm ownership of a domain, download the file and place ot at the specified address, the file at the specified address must be accessible from outside the Merchant’s network.
- Click Verify to verify the domain.
Step 1. Create Certificate Signing Request
- Open Keychain Access on Mac.
- Certification assistant -> Request a certificate from a Certificate Authority.
- Specify the email, to which the developer’s account was registered, the name (also key name). Select Saved to disk and Specify information about a pair of keys manually.
- Select the key size 2058 bits and the RSA Algorithm. Click Continue button. Save the .certSigningRequest file.
Step 2. Issue Merchant Identity Certificate
- Return to the developer’s office. Go to Certificates, Identifiers & Profiles / Identifiers.
- Go to Identifiers.
- App IDs -> Merchant IDs.
- Select the needed Merchant ID.
- Create Certificate in Apple Pay Merchant Identity Certificate section.
- Select created in step 1 .certSigningRequest file and click Continue.
- Download Merchant Identity Certificate.
Step 3. Get the certificate private key and private key password
- Double click Merchant Identity Certificate on Mac to install.
- Open Keychain Access and go to Certificates section.
- Find the certificate. Select Export with the right mouse button.
- Select the folder to save the key file in .p12 format, click Save.
- Create password and click OK. Private key <name>.p12 and private key password are ready to work.
Domain re-verification and Merchant Identity Certificate reissue
The merchant must independently monitor the validity of the certificate and domains’ verification (25 months). A new Merchant Identity Certificate must be issued before the certificate expires. Certificates can be used concurrently, so the procedure for issuing a new one is as described in the “Creating a Merchant Identity Certificate” section. Before the expiration of the domain verification period, the Verify button is activated next to it. The verification procedure corresponds to that described in the section “Domain registration and verification”.
2.7.3. Apple Pay Integration
- Enable Apple Pay on the payment page template by adding macro.
- Inform Payneteasy support about the need to connect Apple Pay and send updated templates.
- The customer uses the Safari browser on a device that supports Apple Pay.
- The customer has Apple Pay cards available for payment.

