1.18. Google Pay™ Web

Introduction

Google Pay™ is an electronic wallet system that allows you to make one-click payment using a card stored securely on Google side. There is no need to enter card details during Google Pay™ transaction.
Access to the payment mechanism is possible from any device, which supports Google Pay™.
After choosing Google Pay™ payment method, the payer will see the form on which he confirms his Google account and card he is going to use to pay for order. If payer doesn’t have a previously registered card, he may do it while making payment.

See terms definitions in Glossary.

Integrate Google Pay™ in App with the following steps:

1. Read and accept Terms of Service.
5. Follow the transaction flow instructions: Google Pay™ Web Flow.

How to integrate Google Pay through Payneteasy

Already our client   Not our client yet
If you are Payneteasy client, you can get in touch with your manager or contact us here.   Contact our sales team and we’ll create a test account for you and help to integrate Google Pay in a week.

Terms of Service

The following rules must be complied to use Google Pay™:
The following rules must be complied to use Google Pay™ on websites:

Google Pay™ Account Setup

  1. Connecting Party must register in Google Console. Instead of gmail, you can use a corporate email address.

../_images/gpay-1.png ../_images/gpay-2.png
  1. Then, from the account screen in the console, save the Merchant ID and proceed to the registration of the website in the Google Pay API section.

../_images/gpay-3.png
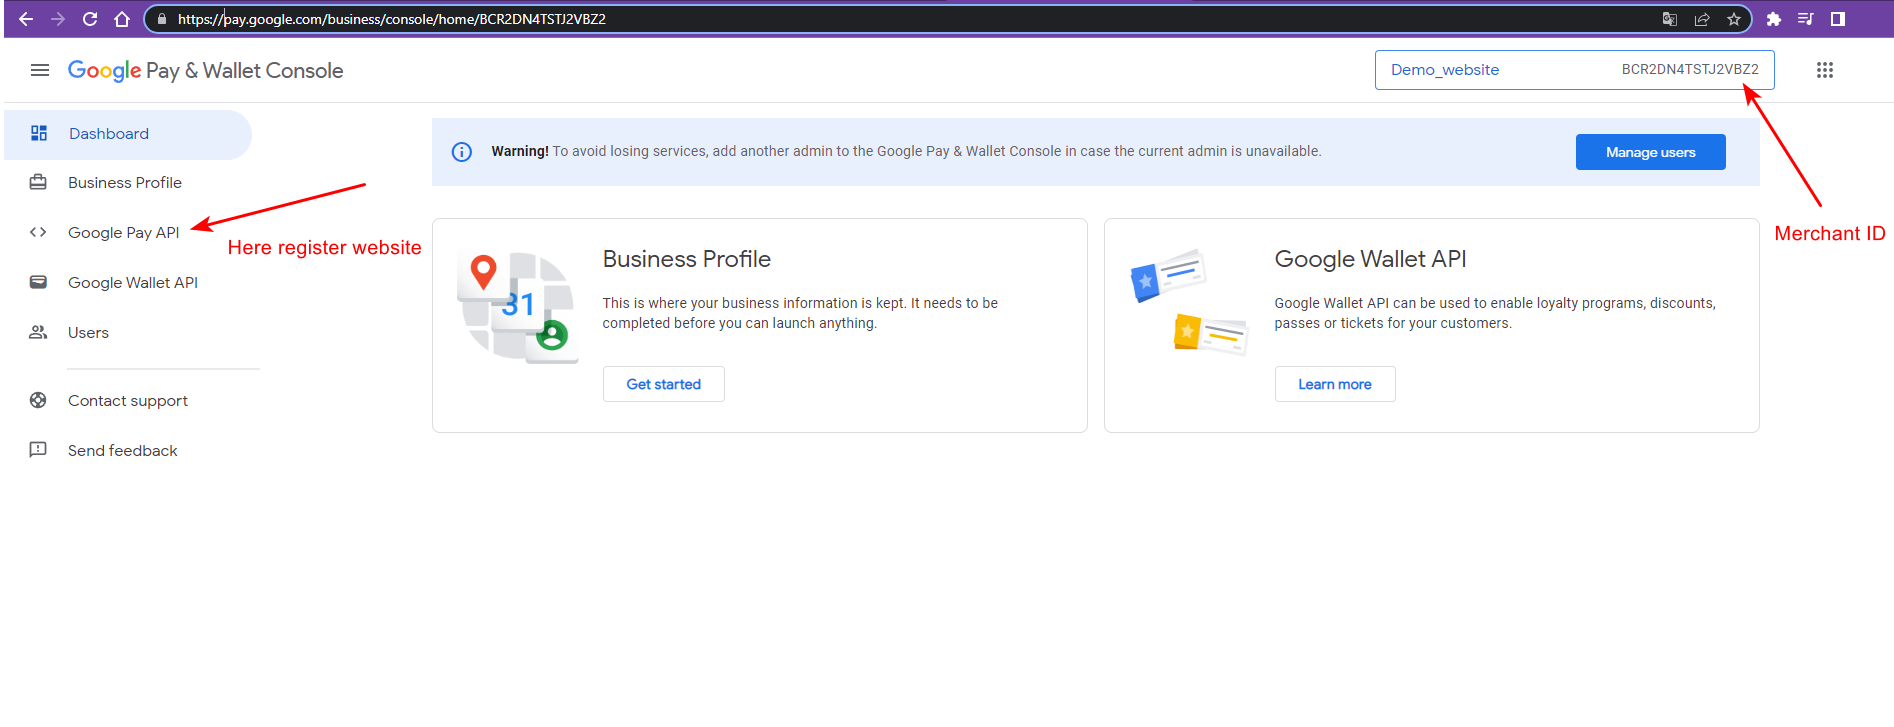
  1. Add a website using the “Add website” button.

../_images/gpay-4.png
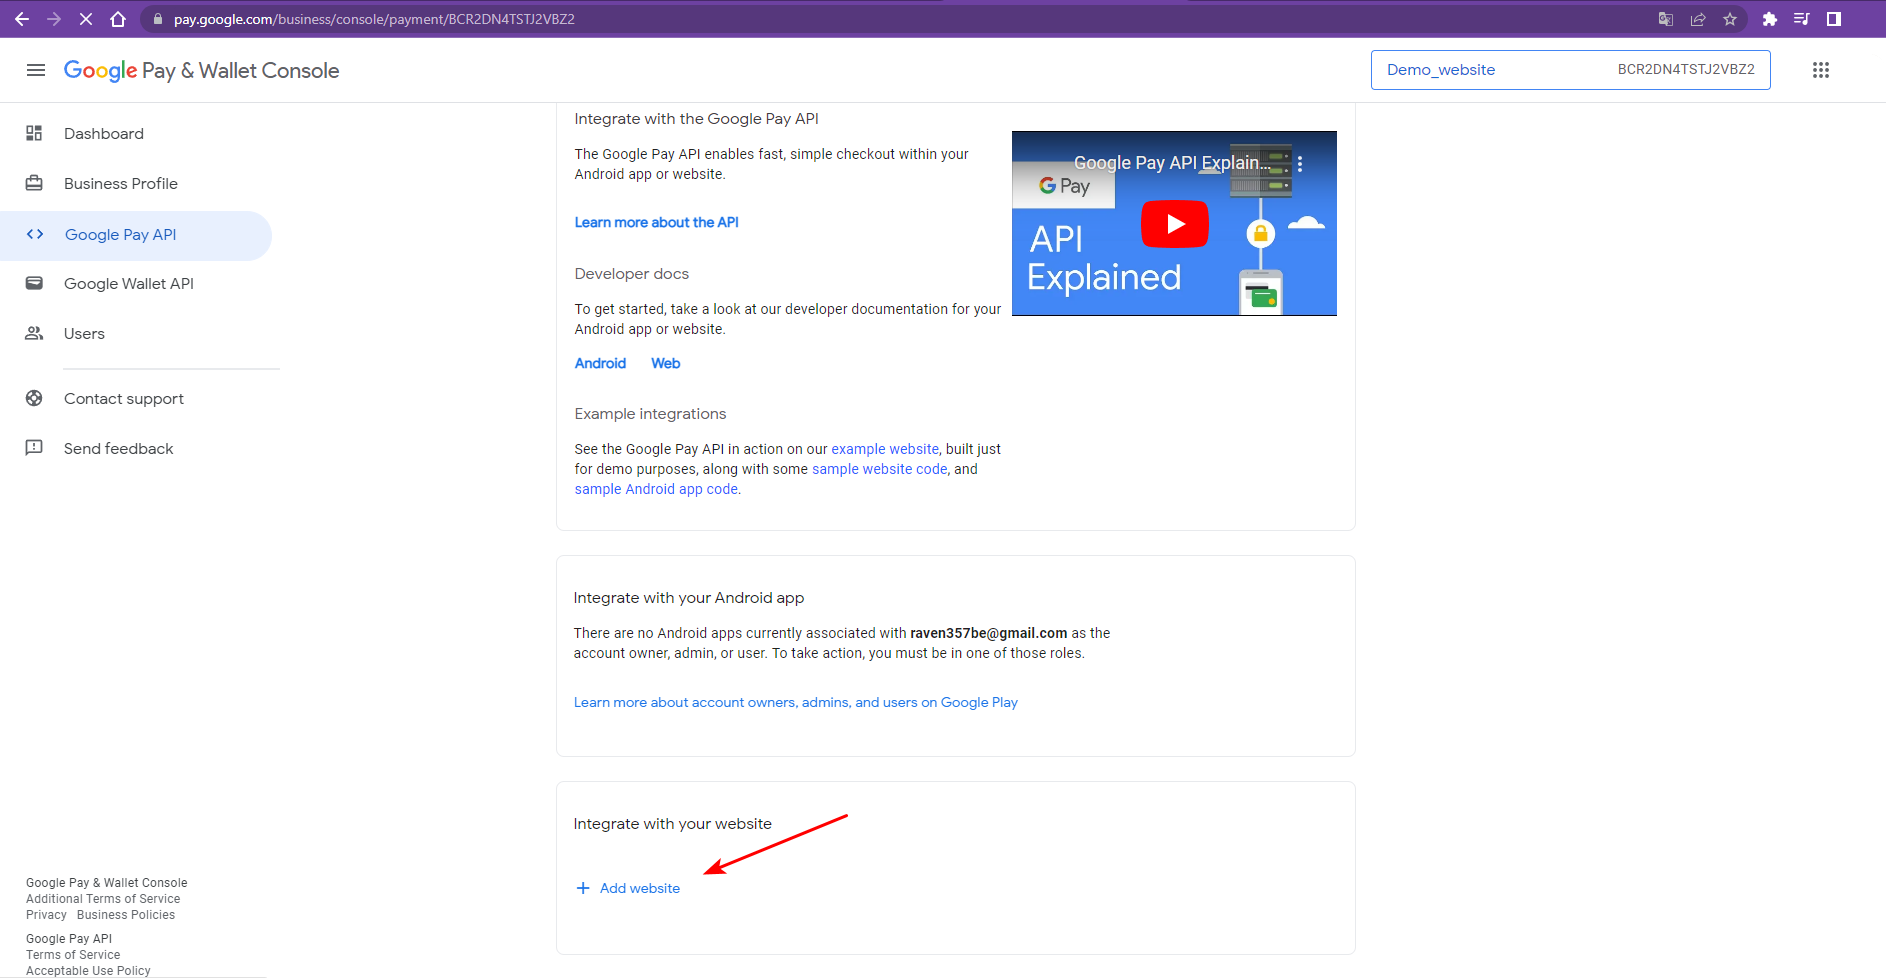
  1. Specify screenshots of the checkout and payment form in the website settings, as well as integration type = Gateway and the address of the Connecting Party’s website from where the purchase starts.

../_images/gpay-5.png
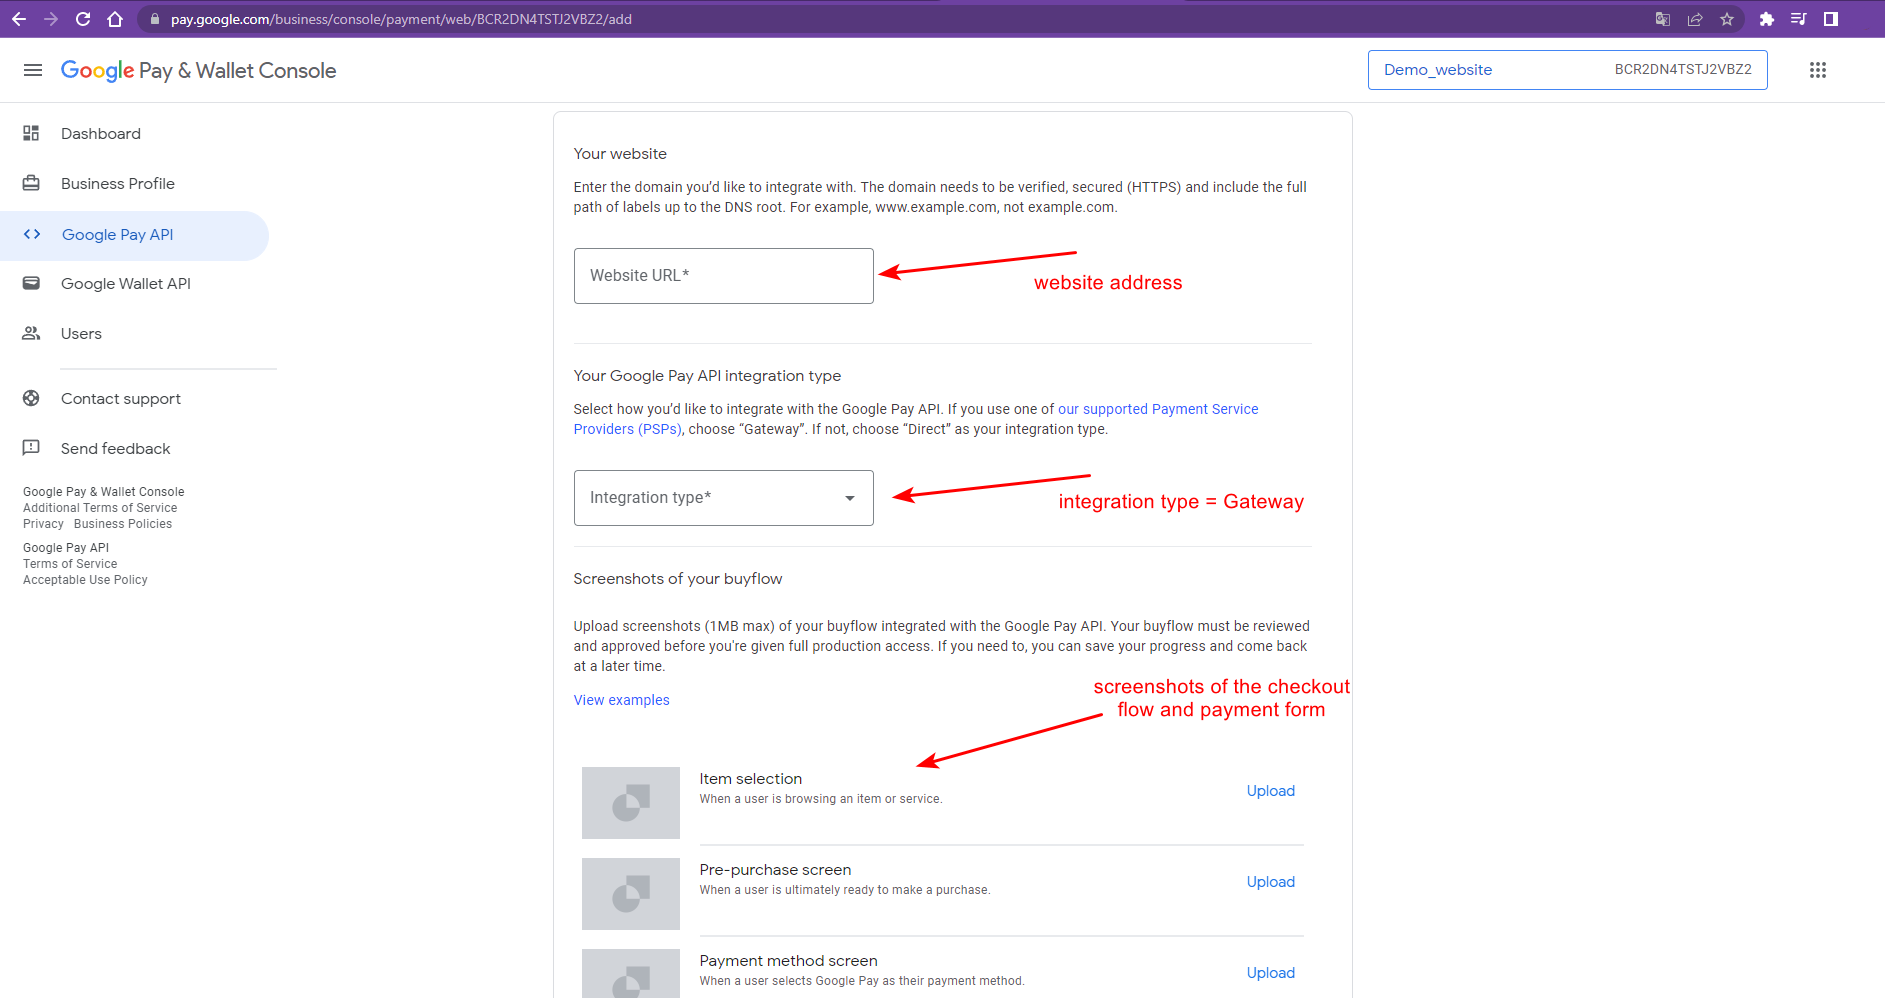
  1. Send the website address and Merchant ID to Payneteasy support managers.

Google Pay™ Integration in a Connecting Party Website

Google Pay™ Authentication Types

Connecting Party can independently choose the card types in Google Pay™ that will be available for payment. The card type is specified in the allowedAuthMethods Google request parameter.
There are two card types (authentication methods):
  1. PAN_ONLY (non-tokenized) - cards stored in payer`s Google account. These cards available on any device of the payer.
    The token contains the number and expiration date of the physical card. That is why 3-D Secure authentication is required for these cards. 3DS is required for PAN_ONLY cards. It can be indicated by the Success==3DS in Google payment response. 3-D Secure authentication does not differ from the standard 3-D Secure.
  2. CRYPTOGRAM_3DS (tokenized) - cards that are stored tokenized on the payer’s device. Tokenized cards are only available on the device where the card was added to the Google Pay™ app.
    The token contains the number and expiration date of the virtual card as well as the 3-D Secure cryptogram. Customer 3-D Secure verification for tokenized cards is not required.

Google Pay™ Allowed Networks

Payment Gateway supports all networks specified in the allowedCardNetworks Google request parameter, such as: VISA, MASTERCARD, etc. For the complete list of allowed networks refer to Payneteasy support.

Required Parameters for Google Pay™ Integration

  1. Register with Google, accept Google Terms of Service, and receive a Google merchant ID after website passes a Google review.

  2. ENDPOINT or ENDPOINGROUPID received from Payneteasy support.

  3. Control-key and Connecting Party login received from Payneteasy support.

Google Pay™ Web Flow

autonumber
skinparam roundcorner 20
skinparam sequenceArrowThickness 2
skinparam ParticipantPadding 30
actor Payer as Customer
participant "Merchant\nwebsite" as Merchant
participant Payneteasy as g
participant "Google Pay™ service" as gps
Customer -> Merchant: checkout
activate Merchant
== Purchase payment request ==
Merchant -> g: sale-form/ENDPOINTID
activate g
Merchant -> g: **OR** preauth-form/ENDPOINTID
g --> Merchant: status=processing,\nredirect-url
deactivate g
Merchant -> Customer: redirect to payment-form redirect-url
deactivate Merchant
activate Customer
Customer -> g: GET redirect-url
deactivate Customer
activate g
g --> Customer: payment-form
deactivate g
activate Customer
Customer -> Customer: press Google Pay™ button
Customer -> Customer: choosing card
Customer -> gps: Submit Google Pay™ form
deactivate Customer
activate gps
gps -> Customer: cryptogram
deactivate gps
activate Customer
Customer -> g: submit payment data\ncryptogram
deactivate Customer
activate g
g -> g: decrypt\ncryptogram CHD
alt CRYPTOGRAM_3DS
g -> g: authorise payment\ntoken, expiry date, 3DS fields
else PAN_ONLY
g->g: retrieve\nIssuer ACS URL
g->Customer: redirect to Issuer ACS URL
activate Customer
Customer->Customer:pass 3DS authentication
Customer->g: redirect back\n3DS fields
deactivate Customer
g->g:authorise payment\nPAN, expiry date, 3DS fields
end
== Final redirect of customer ==
g -> Customer: Merchant website redirect-url
deactivate g
activate Customer
Customer -> Merchant: POST redirect-url\nstatus, orderid
deactivate Customer
activate Merchant
group Get Final Status
== Receive Connecting Party Callback ==
g -> Merchant: Callback with Final Status
activate g
Merchant --> g: HTTP 200
deactivate g
== Order status request ==
Merchant -> g: status/ENDPOINTID
activate g
g --> Merchant: response\nstatus, order-stage
deactivate g
end
Merchant --> Customer: Show result
deactivate Customer
deactivate Merchant

Below we can see Google Pay™ Purchase Flow and Integration steps:

(2) To implement sale-form payment request see /api/v2/sale.
(3) Instead of sale-form it is possible to implement preauth-form payment request see /api/v2/preauth-form. Preauth allows to hold the specified amount in the Payer’s card account for a limited time. Preauth can be followed by Capture or Cancel.
(20) To implement Final Redirect see Final Redirect.
(22) To implement callback with final status handling see Connecting Party Callbacks.
(24) To implement order status request see /api/v2/status/. Status should be requested multiple times with 3-5 seconds interval until final status will be received in response.

Capture Flow

Capture is a transaction followed after preauth which deducts the locked amount from Payer’s card. It is important to know that the block remains for a definite period of time depending on whether this is a debit or a credit card (usually the maximum block period is 7 days for debit cards and 28 days for credit cards).

  skinparam roundcorner 20
  skinparam sequenceArrowThickness 1
  skinparam maxmessagesize 100
  skinparam sequenceParticipant underline
  actor Payer
  participant "Connecting party" as A
  participant "Payneteasy" as B
  hnote over A,B : Successful Preauth Transaction
  autonumber
  group Optional
  Payer -> A: Initiate Capture
  activate A
  end
  == Capture ==
  A -> B: api/v2/capture
  activate B
  B --> A: Order ID
  B -> B: Process Capture
  group Get Final Status
  == Receive Callback ==
  A <- B: Callback with Final Status
  A --> B: HTTP 200
  deactivate B
  == Order Status Request ==
  A -> B: Get Status by Order ID api/v2/status
  activate B
  B --> A: Response with Status, Order-stage
  deactivate B
  end
  group Optional
  A --> Payer: Final Status
  deactivate A
  end

(1) Capture can be initiated by Connecting Party based on internal business model or Payer’s request.
(2) To implement capture request see /api/v2/capture/.
(5) Callback for Capture will be sent only if notify_url was provided in initial transaction request or additional callback URL for Capture transactions is specified on the endpoint level. If server_callback_url was provided in initial transaction request, callback for Capture will not be sent. To implement callback with final status handling see Connecting Party Callbacks.
(7) To implement order status request see /api/v2/status/. Status should be requested multiple times with 3-5 seconds interval until final status will be received in response.
(9) Final Status can be sent by Connecting Party based on internal business model or by Payer’s request.

Cancel Flow

Cancel is opposite of Capture which cancels the deduction and returns locked amount back to Payer’s card. It is important to know that the block remains for a definite period of time depending on whether this is a debit or a credit card (usually the maximum block period is 7 days for debit cards and 28 days for credit cards).

  skinparam roundcorner 20
  skinparam sequenceArrowThickness 1
  skinparam maxmessagesize 100
  skinparam sequenceParticipant underline
  actor Payer
  participant "Connecting party" as A
  participant "Payneteasy" as B
  hnote over A,B : Successful Preauth Transaction
  autonumber
  group Optional
  Payer -> A: Initiate Cancel
  activate A
  end
  == Cancel ==
  A -> B: api/v2/cancel
  activate B
  B --> A: Order ID
  B -> B: Process Cancel
  group Get Final Status
  == Receive Callback ==
  A <- B: Callback with Final Status
  A --> B: HTTP 200
  deactivate B
  == Order Status Request ==
  A -> B: Get Status by Order ID api/v2/status
  activate B
  B --> A: Response with Status, Order-stage
  deactivate B
  end
  group Optional
  A --> Payer: Final Status
  deactivate A
  end

(1) Cancel can be initiated by Connecting Party based on internal business model or Payer’s request.
(2) To implement cancel request see /api/v2/return/.
(5) Callback for Cancel will be sent only if notify_url was provided in initial transaction request or additional callback URL for Cancel transactions is specified on the endpoint level. If server_callback_url was provided in initial transaction request, callback for Cancel will not be sent. To implement callback with final status handling see Connecting Party Callbacks.
(7) To implement order status request see /api/v2/status/. Status should be requested multiple times with 3-5 seconds interval until final status will be received in response.
(9) Final Status can be sent by Connecting Party based on internal business model or by Payer’s request.